
React Native - iOS framework integration
- 04 Oct 2023
- 8 Minutes to read
- Print
- DarkLight
React Native - iOS framework integration
- Updated on 04 Oct 2023
- 8 Minutes to read
- Print
- DarkLight
Article Summary
Share feedback
Thanks for sharing your feedback!
This article is a step-by-step guide to how to integrate SencyMotionLib into your react-native application
1. The first thing that we would like to do is to install the SDK to your iOS app
To do so, in the iOS folder open and edit the Podfile. Add the following code:
require_relative '../node_modules/react-native/scripts/react_native_pods'
require_relative '../node_modules/@react-native-community/cli-platform-ios/native_modules'

source 'https://bitbucket.org/sency-ios/sency_ios_sdk.git' # 1
source 'https://github.com/CocoaPods/Specs.git' # 1

platform :ios, '14.0'
install! 'cocoapods', :deterministic_uuids => false

target 'MotionReactDemo' do
  use_frameworks! # 2
  pod 'SencyMotionLib' # 3

  config = use_native_modules!

  # Flags change depending on the env values.
  flags = get_default_flags()

  use_react_native!(
    :path => config[:reactNativePath],
    # to enable hermes on iOS, change `false` to `true` and then install pods
    :hermes_enabled => flags[:hermes_enabled],
    :fabric_enabled => flags[:fabric_enabled],
    # An absolute path to your application root.
    :app_path => "#{Pod::Config.instance.installation_root}/.."
  )

  target 'MotionReactDemoTests' do
    inherit! :complete
    # Pods for testing
  end

  # Enables Flipper.
  #
  # Note that if you have use_frameworks! enabled, Flipper will not work and
  # you should disable the next line.
#  use_flipper!() # 4

  post_install do |installer|
    react_native_post_install(installer)
    __apply_Xcode_12_5_M1_post_install_workaround(installer)

    installer.pods_project.targets.each do |target|
     target.build_configurations.each do |config|
      config.build_settings['BUILD_LIBRARY_FOR_DISTRIBUTION'] = 'YES'
      config.build_settings['EXCLUDED_ARCHS[sdk=iphonesimulator*]'] = 'arm64' # 5
     end
    end

  end
end
Marked in # is the code you need to add:
- Let Cocoapods know about the source URL's
- Tells Cocoapods to use dynamic libraries
- Add SencyMotionLib pod
- Comment these lines.
- Post-install hooks that allow you to run the SDK in a simulator.
Now in the terminal go to the iOS folder and run the following command:
pod install --repo-updateAnd that's it - the SDK is installed and we can start writing code.
2. Now let's add some code to the iOS App:
First, open the .xcworkspace file and Xcode will open (you can use a shell command from the root directory).
xed .we will need to create 5 files (SDKView.swift, SDKViewController.swift, SDKViewManager.swift,SDKViewManager.m, and Bridging-Header)
2.1 Configuring SencyMotion
In order to configure we will need to create a Objective-C class let's call it SDKConfigure
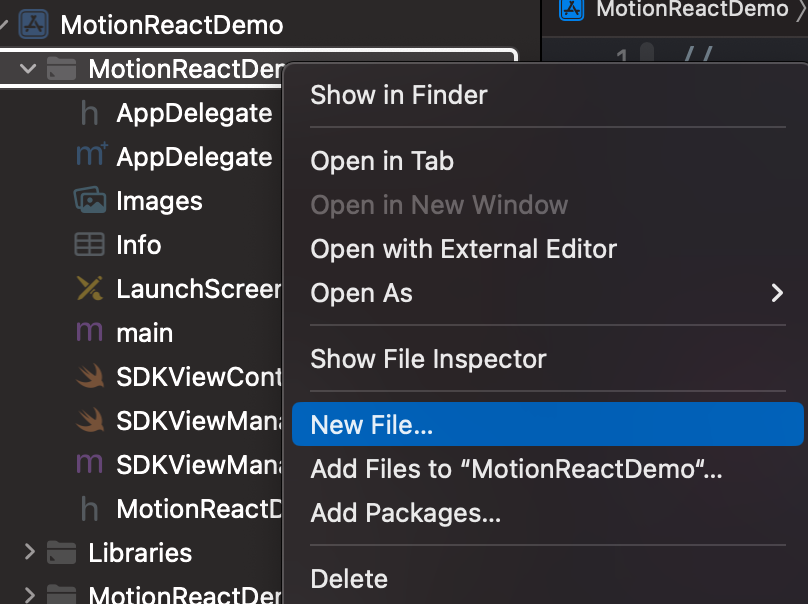
Right-click the project folder and select New File...
Select "Cocoa Touch Class" and then add the nameSDKConfigure and make sure that the language isObjective-C and a subclass of NSObject
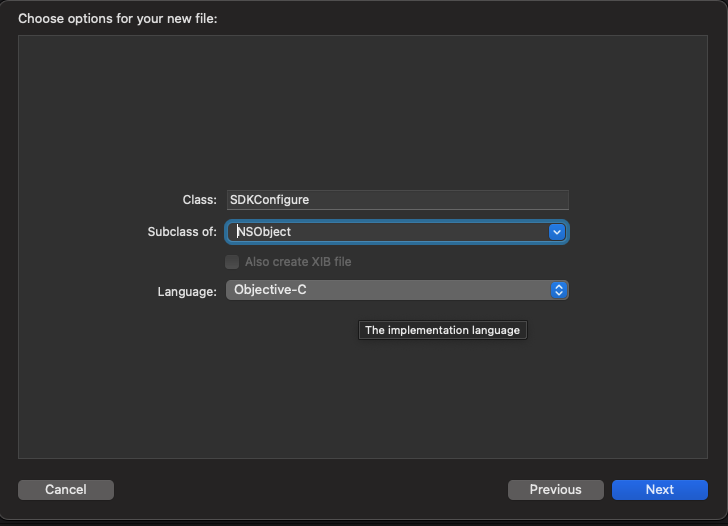
After that, you should have 2 new filesSDKConfigure.h andSDKConfigure.m
InSDKConfigure.h add the following:
#import <Foundation/Foundation.h>

@interface SDKConfigure : NSObject
+(void)configure;
@end
In this code, we add a static function toSDKConfigure.h
now InSDKConfigure.m we need to add configure func implementation
#import "SDKInitalizer.h"
#import <SencyMotionLib/SencyMotionLib-Swift.h>


@implementation SDKConfigure

+(void)configure{
  [SencyMotion configureWithAuthKey:@"YOUR_KEY" onFailure:^(NSError *error) {
    NSLog(@"Error: %@", error.localizedDescription);
  }];
}

@end
In this code, we add the SencyMotionLib framework to the file and called the configure function with the following:
- AuthKey: the key that you got from Sency
- onFailure: a callback in case of an error
Now we are ready to useSDKConfigure class
open AppDelegate.mm and add this line to the top
#import "SDKConfigure.h"Then in this function
- (BOOL)application:(UIApplication *)application didFinishLaunchingWithOptions:(NSDictionary *)launchOptionsAdd this line to the top
[SDKConfigure configure];2.2 let's create the SDKView and the Bridging-Header
Right-click the project folder and select New File...
Select 'Swift File' and enter file name SDKView.swift and press 'Create'

A popup will appear that will ask you if you want aBridging-Header (that's right Xcode will create a Bridging-Header for us) press yes and the two files will be created.
Now please go to theBridging-Header (should be called yourAppName-Bridging-Header.h) and add the following code:
#import "React/RCTBridgeModule.h"
#import "React/RCTViewManager.h"
#import "React/RCTEventEmitter.h"
Now we can start adding the code for our UI.
2.3 Adding code to SDKView
Create a custom UIView and name it SDKView.
import UIKit

class SDKView:UIView{
Add these variables:
  // workout config params
  @objc var bodyZone:NSString = "FullBody"
  @objc var workoutDifficulty:NSString = "LowDifficulty"
  @objc var workoutDuration:NSString = "short"
  @objc var language:NSString = "English"
  @objc var programId:NSString = "leumit_weekly_challenge"

  @objc let startWorkout:()->Void
  @objc let getWorkoutInfo:()->Void

  @objc var onWorkoutDidFinish: RCTDirectEventBlock?
  @objc var onDidExitWorkout: RCTDirectEventBlock?
  @objc var onGetWorkoutInfo: RCTDirectEventBlock?
  @objc var onErrorRecived: RCTDirectEventBlock?
Marked "workout config params" are the variables that will be later used to set the WorkoutConfig model
Other properties:
- startWorkout: a callback for the direct workout start button.
- getWorkoutInfo: a callback for the workout info button.
- onWorkoutDidFinish: an event that will tell the react-native code that the workout is done.
- onDidExitWorkout: an event that will tell the react-native code that the user chose to exit the workout.
- onGetWorkoutInfo: an event that will tell the react-native code that the workout info is ready.
- onErrorRecived: an event that will tell the react-native code that you received a error
Now, we'll add two interface buttons, one for each option:
 lazy var startButton:UIButton = {
    let button = UIButton()
    button.setTitle("START WORKOUT", for: .normal)
    button.setTitleColor(.black, for: .normal)
    button.translatesAutoresizingMaskIntoConstraints = false
    button.addTarget(self, action: #selector(startWorkoutButtonTapped), for: .touchUpInside)
    return button
  }()

  lazy var getInfoButton:UIButton = {
    let button = UIButton()
    button.setTitle("Get Info", for: .normal)
    button.setTitleColor(.black, for: .normal)
    button.translatesAutoresizingMaskIntoConstraints = false
    button.addTarget(self, action: #selector(getWorkoutInfoButtonTapped), for: .touchUpInside)
    return button
  }()

@objc func startWorkoutButtonTapped(){
    startSDK()
  }

  @objc func getWorkoutInfoButtonTapped(){
    getProgramInfo()
  }
Finally, let's add everything to the initializer:
  init(startWorkout: @escaping ()->Void ,getWorkoutInfo: @escaping ()->Void){
    self.startWorkout = startWorkout
    self. getWorkoutInfo = getWorkoutInfo

    super.init(frame: .zero)

    self.addSubview(startButton)
    self.addSubview(getInfoButton)

    NSLayoutConstraint.activate([
      startButton.centerXAnchor.constraint(equalTo: centerXAnchor),
      startButton.centerYAnchor.constraint(equalTo: centerYAnchor),

      getInfoButton.centerXAnchor.constraint(equalTo: centerXAnchor),
      getInfoButton.topAnchor.constraint(equalTo: startButton.bottomAnchor, constant: 10)
    ])
  }

  required init?(coder: NSCoder) {
    fatalError("init(coder:) has not been implemented")
  }
2.4 Adding the controller and implementing the SDK
Create SDKViewController.swift the same way you created the SDKView
Add these imports and create the custom class:
import UIKit
import SencyMotionLib

class SDKViewController: UIViewController {
And now let us add the SDKView we created and other class members
@objc lazy var sdkView = SDKView(startWorkout: startWorkout, getWorkoutInfo: getWorkoutInfo)
  let uuid = UUID().uuidString
  var workoutInfo:WorkoutInfo?

  lazy var sencyMotion = SencyMotion()

  var config:WorkoutConfig{
    WorkoutConfig(
      week: sdkView.week ?? 1,
      bodyZone: BodyZone(rawValue: sdkView.bodyZone as String) ?? .FullBody ,
      difficultyLevel: WorkoutDifficulty(rawValue: sdkView.workoutDifficulty as String) ?? .LowDifficulty,
      language: SencySupportedLanguage(rawValue: sdkView.language as String) ?? .Hebrew,
      programID: sdkView.programId ?? "YOUR_PROGRAM_ID"
    )
  }

override func loadView() {
    view = sdkView
  }
Implement methods for the two options to start a workout with the SDK
First - direct start:
@objc func startWorkout(){
    sencyMotion.addPhoneMovedPopupCustomView(popup: CustomPopup(frame: CGRect(x: 0, y: 0, width: 200, height: 200)))

    sencyMotion.startWorkoutFromProgram(
        viewController: self,
        workoutConfig: config,
        delegate: self
    ) { _ in
// Handle response
}
  }
Custom design for 'phone moved' alert
Notice that -
is used to implement a custom design of your choice.
It's important to remember to implement all delegate methods to control all callbacks.
addPhoneMovedPopupCustomView<ins style="box-sizing: border-box; display: inline-block; background-color: rgb(179, 236, 203); text-decoration: none;">addPhoneMovedPopupCustomView</ins>is used to implement a custom design of your choice.
It's important to remember to implement all delegate methods to control all callbacks.
The second option - get info first, display it in a custom view, and then start the workout.
@objc func getWorkoutInfo(){
    sencyMotion.getWorkoutInfo(workoutConfig: config) { info in
      self.workoutInfo = info

      let jsonEncoder = JSONEncoder()
      jsonEncoder.outputFormatting = .prettyPrinted
      let jsonData = (try? jsonEncoder.encode(info.practice)) ?? Data()
      let json = String(data: jsonData, encoding: String.Encoding.utf8) ?? "NO JSON"

      DispatchQueue.main.async {
      if let didGetWorkoutInfo = self.sdkView.onGetWorkoutInfo{
        didGetWorkoutInfo(["info": json ])
      }
    }
    } onFailure: { error in
      print(error?.localizedDescription ?? "ERROR")
    }
  }

func startWorkoutFromInfo(){
    if let workoutInfo = workoutInfo{
      do{
        try sencyMotion.startWorkout(From: workoutInfo, viewController: self, delegate: self)
      }catch{
        print(error)
      }
    }
  }
Everything looks good but one thing is missing - the delegate implementation, so at the end of the file add the following code:
extension SDKViewController:SencyMotionDelegate{
  func workoutDidFinish(summary: SencyMotionLib.WorkoutSummary) {
    if let workoutDidFinish = sdkView.onWorkoutDidFinish {
      workoutDidFinish(["summary":summary.toJson()])
    }
  }

  func didExitWorkout(summary: SencyMotionLib.WorkoutSummary) {
    if let didExitWorkout = sdkView.onDidExitWorkout{
      didExitWorkout(["summary":summary.toJson()])
    }
  }

  func bodyAssessmentTestDidFinish(result: SencyMotionLib.BodyAssessmentResult) {}

  func didExitTheTest() {}

  func workoutDidFail(error: Error) {
    if let onErrorRecived = sdkView.onErrorRecived{
      onErrorRecived(["error": error.localizedDescription])
    }
  }
}
What we are doing in workoutDidFinish and didExitWorkout is checking that we add in our react-native and then calling it with summary Json.
2.5 Adding the manager
Now that we finished with the UI and the controller it's time for the manager.
Create a new swift file and name it SDKViewManager. Add the following:
import Foundation

@objc(SDKViewManager)
class SDKViewManager: RCTViewManager {

  let sdkVC = SDKViewController()

  override func view() -> UIView! {
    return sdkVC.view as? SDKView
  }

  override static func requiresMainQueueSetup() -> Bool {
    return true
  }

  @objc func startWorkoutFromInfo(){
    DispatchQueue.main.async {
      self.sdkVC.startWorkoutFromInfo()
    }
  }
}
Here we are inheriting from the RCTViewManager that will allow us to expose the view.
2.6 Finally let's create the react-native bridge
To do so we will create a new file, but instead of choosing Swift File, choose Objective-C File and name it SDKViewManager.m.
Now let us add some code :
#import "React/RCTViewManager.h"

@interface RCT_EXTERN_MODULE(SDKViewManager, RCTViewManager)

RCT_EXPORT_VIEW_PROPERTY(bodyZone, NSString)
RCT_EXPORT_VIEW_PROPERTY(workoutDifficulty, NSString)
RCT_EXPORT_VIEW_PROPERTY(workoutDuration, NSString)

RCT_EXPORT_VIEW_PROPERTY(onWorkoutDidFinish, RCTDirectEventBlock)
RCT_EXPORT_VIEW_PROPERTY(onDidExitWorkout, RCTDirectEventBlock)
RCT_EXPORT_VIEW_PROPERTY(onGetWorkoutInfo, RCTDirectEventBlock)
RCT_EXPORT_VIEW_PROPERTY(onErrorRecived, RCTDirectEventBlock)

RCT_EXTERN_METHOD(startWorkoutFromInfo)

@end
There are two things that are important to notice here:
- RCT_EXTERN_MODULE: this will expose the manager. The first argument is the manager name and the second one is the type.
- RCT_EXPORT_VIEW_PROPERTY:this will expose ourvariables like theRCT_EXTERN_MODULEthe first argument is thevariable name name and the second is the type
And we are done with Xcode it's time for react-native
3. Adding to react native
Sample implementation. of App.js to use the SDK as it is implemented in the example above
import React, { useState, useRef } from 'react';
import { StyleSheet, requireNativeComponent, Alert, Modal, View, NativeModules, Text, Pressable } from 'react-native';

const MyViewController = requireNativeComponent('SDKView');
const MyNativeModule = NativeModules.SDKViewManager;

const ViewStyleProps = () => {
  const [modalVisible, setModalVisible] = useState(false);
  const [workoutInfo, setWorkoutInfo] = useState('NO INFO');

  var jsonObject = null;

  const didExitWorkout = (e) => {
    console.log(e.nativeEvent.summary);
    console.log('didExitWorkout');
  };

  const workoutDidFinish = (e) => {
    console.log(e.summary);
    console.log('workoutDidFinish');
  };

  const didGetWorkoutInfo = (e) => {
    console.log('didGetWorkoutInfo');
    const info = e.nativeEvent.info;
    jsonObject = JSON.parse(info);
    setWorkoutInfo(JSON.stringify(jsonObject))
    console.log(workoutInfo);
    setModalVisible(true);
  };

  const workoutDidFail = (e) => {
    console.log(e.error);
    console.log('workoutDidFail');
  };

  const myViewControllerRef = useRef(null);

  return (
      <MyViewController
        style={styles.sdk}
        bodyZone={'LowerBody'}
        workoutDifficulty={'HighDifficulty'}
        languge={'Hebrew'}
        onWorkoutDidFinish={workoutDidFinish}
        onDidExitWorkout={didExitWorkout}
        onGetWorkoutInfo={didGetWorkoutInfo}
        onErrorRecived={workoutDidFail}
        ref={myViewControllerRef}
      >
      <Modal
        animationType="fade"
        transparent={true}
        visible={modalVisible}
        onRequestClose={() => {
          setModalVisible(!modalVisible);
        }}>
          <View style={styles.centeredView}>
          <View style={styles.modalView}>
            <Text style={styles.modalText}>{workoutInfo}</Text>
            <View style={[ styles.container,{ flexDirection: 'row', gap: 50}]}>
            <Pressable
              style={[styles.button, styles.buttonBack]}
              onPress={() => setModalVisible(!modalVisible)}>
              <Text style={styles.textStyle}>Back</Text>
            </Pressable>
            <Pressable
              style={[styles.button, styles.buttonStart]}
              onPress={() => {
                MyNativeModule.startWorkoutFromInfo()
                setModalVisible(!modalVisible)
              }}>
              <Text style={styles.textStyle}>Start</Text>
            </Pressable>
            </View>
          </View>
        </View>
      </Modal>
        </MyViewController>
  );
};

const styles = StyleSheet.create({
  description: {
    fontSize: 18,
    textAlign: 'center',
    color: '#656565',
    marginTop: 65,
  },
  sdk:{
    flex: 1,
    alignItems: "center",
    justifyContent: "center"
  },
  centeredView: {
    flex: 1,
    justifyContent: 'center',
    alignItems: 'center',
    marginTop: 22,
  },
  modalView: {
    margin: 20,
    backgroundColor: 'white',
    borderRadius: 20,
    padding: 35,
    alignItems: 'center',
    shadowColor: '#000',
    shadowOffset: {
      width: 0,
      height: 2,
    },
    shadowOpacity: 0.25,
    shadowRadius: 4,
    elevation: 5,
  },
  button: {
    padding: 20,
    elevation: 2,
  },
  buttonOpen: {
    backgroundColor: '#F194FF',
  },
  buttonStart: {
    flex:2,
    backgroundColor: '#2196F3',
  },
  buttonBack:{
    flex:2,
    backgroundColor: '#820000'
  },
  textStyle: {
    color: 'white',
    fontWeight: 'bold',
    textAlign: 'center',
  },
  modalText: {
    marginBottom: 15,
    textAlign: 'left',
  },
});

const App = () => {
  return ViewStyleProps();
};

export default App;
- First import requireNativeComponent
- Then you will need to get SDKViewManger as you can see when you call, javascript automatically omits 'Manger', react-native ignores it
- Create the callbacks for the events we created
- It's time to call the view as you can see I am also settings thevariables we created in the view
And you are done! Run the app and you should be able to start the SDK.
Demo React Native project
You can download this demo app project for a quick startup
Was this article helpful?